IMPORTANT!
The code provided at the end of this post will no longer work with Bitty Data Logger. As of version 4.0, micro:bit events are no longer used to transmit arbitrary data values over Bluetooth. Therefore the transmitSensorData function in the code below needs to be changed to use the new approach, with the Bluetooth UART service. See http://bittysoftware.blogspot.com/2019/06/bitty-data-logger-40.html for details and https://github.com/bittysoftware/bitty_data_logger_device_code for Bitty Data Logger code examples.But good news! Full source code which uses the new approach is available in the Bitty Software GitHub repository, along with a ready-made hex file:
Visualising the Invisible!
I was recently contacted by a professional educator, based in Alberta, Canada called Jennifer Ferguson. Jennifer (@FergeeksonGirl on Twitter) works for a charitable, education and outreach organization called Let’s Talk Science (@LetsTalkScience) and has been using Bitty Data Logger.
The reason Jennifer made contact was to talk about her current project, Living Space, an education initiative developed with the Canadian Space Agency and to ask for some assistance.
Living Space is concerned with monitoring key environmental conditions, including carbon dioxide (C02) levels. Jennifer wanted to be able to connect a Carbon Dioxide sensor to a micro:bit and to communicate its readings to Bitty Data Logger over Bluetooth so that the data could be visualised, logged and shared.
C02 Monitoring
C02 monitoring is widely used in all sorts of applications, many of them really important, some of them surprising. Examples include heating, ventilation and air conditioning (HVAC) systems, large scale city environmental monitoring, and aspects of food production, including monitoring of plant cultivation environments and improved food storage. It’s used in laboratory incubators for monitoring cell cultures and in healthcare for things like breath analysis applications where the sensor has to deliver results very rapidly, at around 20 measurements per second. Breath analysis data allows for monitoring conditions such as asthma. And of course, a C02 sensor being a sensor, it’s something you’d expect to find in larger scale connected systems which we might file under the umbrella term “Internet of Things (IoT)”.
Jennifer was working with an impressive sensor, the CozIR®-A made by Scottish company GSS (Gas Sensing Solutions). Some models, such as this one can take temperature and humidity readings as well as C02 measurements.

Let’s start by getting to know the CozIR®-A sensor.
Connecting a micro:bit to the CozIR Sensor
The CozIR®-A sensor has a number of pins on its underside. The important ones are GND, 3.3V power and serial receive (RX) and transmit (TX) pins. Yes, the interface is a UART interface, which allows serial communication, one bit at a time using two of the pins, one for transmitting bits and one for receiving. To connect the CozIR®-A to a micro:bit, you make connections like this:
| CozIR®-A | Micro:bit |
| GND | GND |
| 3V3 | 3V |
| TX | RX |
| RX | TX |
Note how TX on the CozIR®-A is connected to RX on the micro:bit and RX to TX. This makes sense if you think about it. Data transmitted from the sensor has to be received by the micro:bit. Data transmitted by the micro:bit has to be received by the sensor.
Here’s what a micro:bit connected to a GSS CozIR®-A sensor looks like:


As you can see from the photos, I powered my micro:bit and sensor from a couple of AAA batteries. Jennifer tells me that readings start to get inaccurate when the battery gets low though, so you may prefer to power from a USB cable or other power supply.
Communicating with the CozIR®-A Sensor
The GSS CozIR®-A sensor uses a simple protocol for sending and receiving data and commands over the UART connection with a microcontroller like our micro:bit. All commands and data consist of ASCII characters only and they’re all, always terminated with carriage return, line feed characters i.e. \r\n or ASCII characters 0x0D and 0x0A.
The software guide that comes with the GSS CozIR®-A sensor is very good, and it doesn’t take long to understand the protocol and pick out those commands and responses that are required for your purposes.
There are three operating modes defined. Mode 0, Command Mode stops the sensor from making measurements. It will respond to commands when it receives them but otherwise is more or less dormant. Mode 1, Streaming Mode has the sensor making and reporting measurements every 500ms by default. Mode 2, Polling Mode makes measurements in the background but does not report them unless it receives an appropriate command from the connected micro:controller.
To request a particular mode #, the command K #\r\n must be sent. So for polling mode, the command is K 2\r\n. Note the space character between “K” and “2”.
For the best, most accurate readings, the sensor needs to be calibrated. The protocol supports calibrating the sensor in a number of ways, including in a known gas concentration, which is the recommended approach or, for those of us without a supply of a suitable reference gas, in fresh air.
Requesting fresh air calibration is achieved by sending the command G\r\n to the sensor.
Micro:bit and the CozIR®-A Sensor
Jennifer had already put together a MakeCode application which could acquire sensor readings from the CozIR®-A and display them on the micro:bit’s LED display. Her application made use of a handy package of custom blocks written by Simon Monk of Monk Makes that took care of the nitty gritty details of talking to the sensor, making her application very easy to read. Here’s the original code which she sent to me:

The application starts by configuring the micro:bit serial communications system to use pins 0 and 1 from the edge connector instead of using the USB connector for serial data. It then sits in an infinite loop, calling one of three custom block functions to obtain a C02, temperature or humidity reading, depending on the value of a variable called mode. The mode variable can be changed by pressing button A so that you can switch from C02 to temperature to humidity readings at the click of a button. Values returned by the custom block are simply displayed on the micro:bit LED grid.
The CozIR®-A Custom Blocks and Serial Communications
The CozIR®-A custom blocks which the Let Talk Science application uses, works like this:
There are a number of functions which the application using the block will call, such as the function C02(). Functions like this one send a command to the sensor (in this case Z \r\n) by writing to the serial interface, wait for 200ms and then return the value of a variable which should now contain the latest measurement of the requested type.
    export function Co2(): number {
        serial.writeString("Z\r\n")
        basic.pause(200)
        return co2
    }
How the variable gets assigned the latest measurement, is explained by looking at the code behind another part of the CozIR custom blocks. Responses to all commands are received from within an event handler, serial.onDataReceived which is called whenever there’s data waiting to be read from the serial port as will be the case when a command has been processed. The response data gets read into a string variable, examined to see what type of response it is and then values extracted and assigned to the appropriate variable. For example, C02 readings always start with a Z then a space and then the value in parts per million (ppm). So this code checks for a response that starts with “Z” and then extracts the associated value:
response = serial.readUntil(serial.delimiters(Delimiters.NewLine))

value_str = response.substr(3, 5)
let value = parseInt(value_str)
// basic.showString(response.charAt(1))
if (response.charAt(1) == 'Z') {
    let co2_uncompensated = value
    co2 = co2_uncompensated + (altitude * 556) / 10000
}
As you can see above, it’s the variable c02 that gets returned by the Co2() function.
The Micro:bit Event System
The BBC micro:bit lets software components talk to each other using event objects. An event is just data which indicates that something in particular has happened and has an associated value or sub-type. Software components can both generate events and indicate that they’re interested in being notified about particular types of event happening elsewhere in the system, when they occur. For example, I might write some code that wants to know when either of the micro:bit’s buttons is pressed. The software component in the micro:bit firmware that is responsible for handling the buttons, known as a driver, generates events whenever buttons get pressed. All my code has to do to receive these events is to register its interest in this type of event using a micro:bit function, and specify what I want to happen when such an event takes place. In the MakeCode programming system, we’re given ready-made blocks for this purpose such as the onButtonPressed block.
Including the onButtonPressed block in my code, simply means “please tell me if a button gets pressed and execute this code when this happens”.
Events are said to travel along a message bus which you can think of as being like a pipe that events flow along, with some software components injecting event messages into the pipe and others syphoning off copies and processing them.
Technically, events are 32-bit numbers with the first 16 acting as an event identifier (ID) which tells us what type of event it represents and the second 16 acting as a sub-type or an associated value which can be as large as 65535.
Communicating with Bitty Data Logger
Bitty Data Logger uses the micro:bit event system. One of the nice things about the event system is that software components that generate or process events do not have to be inside the micro:bit! They can be connected to the micro:bit over Bluetooth using something called the Event Service. All MakeCode applications which use the Bluetooth package, automatically have the event service built into them, meaning that events can be used for bidirectional communication between the micro:bit and the other device, connected over Bluetooth.Various event types are used by Bitty Data Logger. These are the ones which were useful in communicating CozIR®-A sensor data:
| Event ID | 9020 | 9030 |
| Event Name | Pin Selection | Data |
| Direction of Communication | bitty data logger to micro:bit | micro:bit to bitty data logger |
| Purpose | Let’s bitty data logger tell the micro:bit which pins on its edge connector to read data from before transmitting it over Bluetooth. | Each 9030 event has a value which combines a pin number with a value. This is how up to three different types/sources of data from an external device, connected to the micro:bit, can be communicated to bitty data logger. |
| Data Format | Bits 0, 1 and 2 are used to select pins 0, 1 and 2 for sampling. For example: 00000010 means pin 1 should be read. 00000111 means pins 0, 1 and 2 should all be sampled. | Bits 0-9 contain value. Bits 15-14 contain a pin no. So a single event value, indicates both the pin that the data comes from and the data sampled from that pin. |
In MakeCode, to be notified whenever the 9020 Pin Selection event is sent over Bluetooth from Bitty Data Logger, and to set some flags indicating which of pins 0, 1 and 2 have been selected in the app, this is all we need to do:

To formulate a 9030 data event and send it to the smartphone application over Bluetooth, I usually place the code in a MakeCode function block which I can call from elsewhere, like this:

It’s that easy!
Changing the Let’s Talk Science code to work with Bitty Data Logger
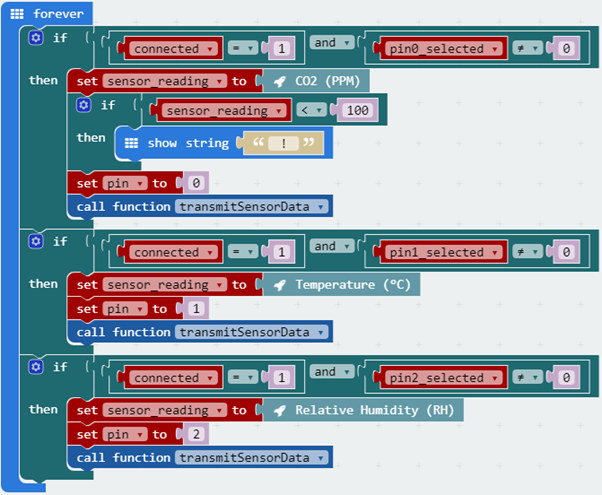
To adapt Jennifer’s code to work with Bitty Data Logger, I decided to cheat a little. I decided to pretend that C02 readings were associated with pin 0, temperature readings with pin 1 and humidity readings with pin 2. Of course, all of these readings are being returned over the micro:bit’s pin 1 which is receiving serial data from the sensor’s TX pin but let’s not quibble. Pretending that the three sensor data types come from different pins, allows us to transmit and classify the three types of data separately so that Bitty Data Logger can capture and chart the data in the usual way.Reading data from the sensor is performed in a Forever block and only happens if we’ve accepted a Bluetooth connection, indicated by a variable which gets set when a connection is established or lost, in these event handlers from the MakeCode Bluetooth package:

Demonstration
Conclusion
The GSS Carbon Dioxide sensor is great for all sorts of science projects and has great relevance to a range of real world issues. As always, Bitty Data Logger allows phenomena to be visualised and analysed, which is a big help in furthering a deeper understanding.Give it a try! Bitty Data Logger is in the Apple App Store and Google Play.
http://bittysoftware.blogspot.com/p/applications.html#bdl
Full Solution
IMPORTANT!
This code will no longer work with Bitty Data Logger without some changes being made. As of version 4.0, micro:bit events are no longer used to transmit arbitrary data values over Bluetooth. Therefore the transmitSensorData function in the code below needs to be changed to use the new approach, with the Bluetooth UART service. See http://bittysoftware.blogspot.com/2019/06/bitty-data-logger-40.html for details.
But good news! Full source code which uses the new approach is available in the Bitty Software GitHub repository, along with a ready-made hex file:
https://github.com/bittysoftware/bitty_data_logger_device_code/tree/master/microbit
This code will no longer work with Bitty Data Logger without some changes being made. As of version 4.0, micro:bit events are no longer used to transmit arbitrary data values over Bluetooth. Therefore the transmitSensorData function in the code below needs to be changed to use the new approach, with the Bluetooth UART service. See http://bittysoftware.blogspot.com/2019/06/bitty-data-logger-40.html for details.
But good news! Full source code which uses the new approach is available in the Bitty Software GitHub repository, along with a ready-made hex file:
About GSS
“We design and manufacture the fastest response, lowest power, and most robust CO2 sensors around. It’s our core solid-state technology that really sets us apart. We make special mid infrared LEDs in-house, and use this solid-state technology at the core of our sensors to help you achieve ambitious power, speed and endurance goals. That means, no warm up time; instant on/off; very low energy (as low as 3mW); no moving parts; and a long lifetime – over 15 years in some applications.As for applications, our sensors have just about done it all – land, sea and space! They’ve been blasted into space, submerged beneath the seas - and most things in between! As engineers and scientists, we’ve amassed years of experience in solid-state CO2 sensor development. We did it first, and that’s all we do, so we know CO2 sensors inside out. That means there’s every chance we’ve already delivered a solution for your application. And if you’re looking to do something a bit special, we can work with you to adapt an existing product, or develop a brand new solution for your project. Just send us your brief and let’s get started!
Contact:


